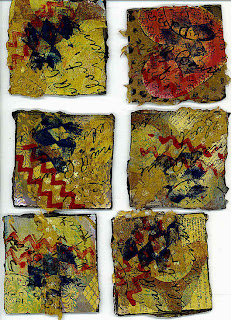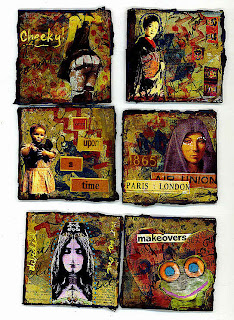


 You can click on the picts to get a larger view. I did these as samples for the Collage Composition 3x3 Swap. You are always welcome to join the group and play. You need to only make 3 of them. I am hoping to teach this at Art Unraveled next year as a beginner's workshop. Would you take this class?
There are many ways to collage. This is just one. For the benefit of Collage Comp members, I will briefly go through the steps.
Step 1: Find a good, solid substrate or background to work on. I chose an old Monopoly board. Cut up several with an Exacto knife and mat so you don't have to keep going back to cut up more. I always advise people to make an extra or a prototype for themselves so they won't feel badly about letting their creations go for a swap. Also, I used a Distress Ink pad to do the edges so I did not get have cardboard looking edges.
Step 2: You can gesso, paint, or put paper on the board or whatever surface you decide to work on. If you are going to paint, then use black or a dark color if you are not going to gesso first.
Step 3: Layer, layer, layer! Don't be afraid to layer on different papers and textures. If you are working on a painted background, then layer colors and textures. It does not have to look cohesive right now. That will happen later. Don't forget that you can use words or text as part of your background. It looks great later on.
Step 4: Once you have the background done, then use some lighter paint/fluid acrylic/wash so that the background blends together better. I don't like Adirondack Dabbers much because the Dabber part does not work after awhile and a lot of the paint dries up (for me, at least). I do like the mushroom color It is a great background color. I put that on lightly with a brush and then immediately take a wet wipe and wipe it all over the surface so that there is only a light film on the background. I then took a Golden't transparent yellow iron oxide wash and did the same thing with brush and wipe. Let dry.
Step 5: I like to have text, colors, patterns, and things of interest in the background. I think the focal image should complement my background instead of the other way around. I sometimes think it is a shame to cover up some of the backgrounds that I create. I used some acrylic paint and foam stamps on the background. Some great foam stamps are from Junkitz and Heidi Swapp. I have seen the Heidi Swapp ones in the craft stores. I get the Junkitz ones online - sometimes from eBay. I also used a large stamp with black StazOn. The writing is pretty dominant in some of the collages. If the acrylics come across too bold, then use a wet wipe and dab it so that it looks more old and distressed.
Step 6: this is where you start pulling out collage images for focal points. I use various ones from different sources. Some sources include outsidethemargins.com, teeshamoore.com, artchix, and Bernie Berlin (love her collage images and you are helping animals at the same time!). Can't forget Suze Weinberg, she has some very cool women images.
Step 7: Before you put down the collage images, position them on your collage with other elements. I like words, shapes, and pieces of metal anything. I chose to use my white fine point poster marker a lot in these collages. I added a little yellow iron oxide after it dried so it would not be so stark white in contrast to everything else. I know the space is limited but don't forget to move the collage around and upside down to see if you are using good composition elements. Take a good look at your collage and notice where your eye travels. Is it good? Do you like it? If you do, then glue it down. No floaters, please.
Step 8: You do not have to do the edges but I do because I think it completes the collage. I use my fingers for this because I have more control. I start with black and/or brown paint and just start edging the collages. Wipe excess off. You are just doing the edges without going very far into the collage. Then I used some transparent red iron oxide and finally, some blue color (very sparingly).
Step 9: Embellish as desired. I am one of those people who think less is better than more. I used to embellish the hell out of my stuff. I don't do that anymore. Does your collage image contrast from the background? You don't want it to blend into your background too much. Is there too much negative space? Do you need a little something? You can always overstamp or put a couple of words there. Write, journal, add some fiber or fabric, eyelets, brads, wire, eyes - do what you like to do. If you have to, add a pointy hat or some wings (even though I think that has been overdone). Remember, you create what YOU like.
Step 10: Step back. Do you love it? Go away and come back to it later. If it still needs something, then play some more. You are done when it feels done.
Tips: If you are using a photograph, you can kind of blend in the edges of the pict by using a wet wipe and wiping the edges of the photo. It will kind of soften and blur. Paint the edges along with your background. With collage images, use a small brush or your fingers and paint the edges of the collage image with the last color you used on your background. It will look more like part of your background. You can also soften it with using a Distress pad - color depends on you. If you are going for a vintage, distress look, then use a sanding block and lightly sand the collage image so it does not look so new. There is a sanding block out there for scrapbooking that is supposed to distress your pict without taking the print off. I have one but don't remember who makes it. You can also color it with a wash to remove some of its newness. You can use marker or pen to outline the collage images to bring them out more from the rest of the collage. Don't be afraid to play and to experiment. If you like something, then write it down somewhere like the back of your collage so you will remember it the next time you want to do it.
Comments welcome.


5 comments:
Your 3" squares are wonderful. And what an excellent step-by-step guide to creating collage. I have only dabbled and been a bit mystified on how artists (like you!) get such results. Thanks!
I love the squares Belinda and a great tutorial.
Hugs, Alis
This is a great tutorial Belinda, thanks! This can work for different sizes of collage.
Thanks again!
OMG! these are awesome..I am a so artist "newbie" "wannabee" "been sheltered bee" by the ... "u will never amount to anything bee." so I want to join a place that will "train" yet " help me "explore" by artist BEE... so how can I join this swap?
Great collages, good work!!
Post a Comment