 This is how I made my latest batch of fabric paper. I started out by laying out some rosin paper on the floor and then taping down some freezer paper onto the rosin paper. The freezer paper has to be shiny side up. You have to have the freezer paper shiny side up so you can peel the fabric paper up once you are done gluing and painting on it, otherwise the freezer paper will stick to it. I use rosin paper because I do fabric paper in large batches and it saves my carpet from drips. You can just lay plastic or newspaper instead. When the freezer paper comes out of the roll, it likes to roll back onto itself, so I just use some masking tape and keep it taped down on all four corners. After that is all done, it cut a piece of thin muslin and put that down. It doesn't really matter if it is natural or white. I use the cheapest, thinnest muslin that I can find. I get is from Joann's with my 40% off coupon most of the time. You want it thin since you are making paper with it.
To make the glue wash, it is a 1-to-1 ratio of liquid glue and water. I just add a tad more glue than water. Make sure you mix it up really well so you don't have any globs of glue in the wash. Also, use a sponge/foam brush or an paint brush that you can throw out or wash out right away. I always use a foam brush that I toss. Also, don't use those glues that dry glossy unless you like that look. I don't like glossy. I always use Sobo liquid glue but it is a personal preference.
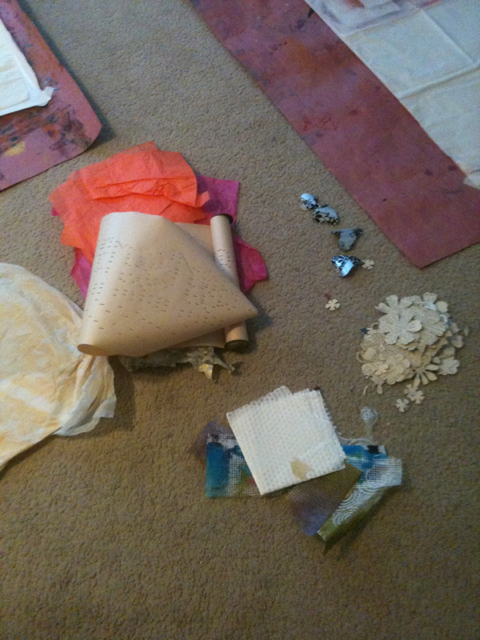 Always have your stuff ready when you are making fabric paper. You can use whatever thin papers you want. You are not limited to tissue paper or wrapping paper. I have used handmade papers and die cuts. I also use the left over paper from making the die cuts and text papers. I also use piano paper with the hole in it. I love the colored tissue paper that I get from other people and that I get sent as packing. The tissue paper that I use the most is the cheap white stuff that I get from Micheals. I also have found the cheap natural tissue paper they use for purses work well.
 Although a lot of fabric paper is done with just laying down strips of paper directly onto the muslin, I tried laying down strips of colored tissue paper first this time. I always lay down a layer of glue wash first onto the muslin. Don't worry if everything doesn't lay down completely. Your top layer of tissue paper will take care of that. Make sure you leave some gaps of muslin showing and don't overlap your tissue paper or papers. If it gets too thick, you aren't really making fabric paper. You won't be able to sew on it. The idea is to leave it still flexible. That means to leave some gaps of muslin showing. So use thin papers. The only things I ever overlap are the handmade Japanese tissue papers that are full of holes that are meant for texture. The texture comes out when I paint it.
 You can see on this one where I laid down the tissue paper and then the left over from the die cuts. I left room in between and did not overlap. On the right side, you can see where I put on the top layer of tissue paper. You always do a glue wash for each layer. You tamp on the top layer of tissue paper instead of broad strokes or the tissue paper breaks apart. It is okay if it kinds of crunches up. Somtimes, I don't even do the top layer of tissue paper.
Here is one where it is dried before sewing. I normally color it before it dries because I like the colors to meld and spread. I used the Spritz sprays this time. If you use acrylics, you might want to water it down so it will allow the underlying textures to come through. Watercolors work well, too.
 This is where I sustituted a pattern for tissue paper.
 Here is where the colors flowed together. After the glue has dried, you can sew on it, cut it apart, stamp on it, and do with it what you want. I am going to take these pages and use some of them for the swap. The rest of them are going to be made into a book/journal for a dear friend.


10 comments:
Thanks for the in depth look at how you make your papers. I love reading about other artist's process!
A great share! Wonderfully inspiring!
Gorgeous! There's so much to browse on your blog. I am into scrapbooking, cardmaking, etc. I liked to use natural items and recycle in my own art. My first main hobby is photography. I would love to get into making my own paper, but right now I don't have a craft to keep out the cats.
I am a fantasy and horror author, but I have shared a collection of my latest cards in my blog post: Less Stress Equals Success!
-Nora
http://norabpeevy.blogspot.com/
that last one is beautiful. thanks for tell and show. i don't put the white tissue on top last layer either. prefer to let the snips and bits of tissue and colorful paper do the talking
This turned out beautifully! Found you from CPS website!
this turned out beautifully! found you from CPS website! :D
Hi!
Wanted you to know I posted a link to this tutorial today on my blog.
Nancy Ward
PaperFriendly
http://www,nancywardcrafts.com
Love your tutorial on fabric paper.
I have done this once but my pieces turned out quite stiff. I think I used too much glue and not enough water,,
I shall try again.
Thanks for the inspiration.
I am putting you on my blog roll so I can visit lots..
xoxo
((((hugs))))
Maggie
Thank you so much for taking the time to share with you As we all travel this journey to making real our images, you are a delight!!
I like the idea of using different types of thin papers for fabric paper.
Post a Comment