All the picts are below this message. You can click on the picture for a larger view. The front cover is with the boy running and the hand. The back cover is the flowerpot - near the bottom of my journal picts.
I feel that it is done now. I bought it to my artist's reception to show my art friends. I am really happy with it. I think that my colors are much richer. I did some bright pages. I was totally groovin on the sewn pages. I like to play on my sewing machine. The bobbin thread kept running out though.
Signatures. I did it her way with the first ones I did. I took the 5-7 sheets like she said and put them inside one another like in booklet form. I also had a piece of card stock about the size of my journal. I poked holes in it with an awl at about 1/2" coming in from both ends and meeting in the middle. I then proceeded to use that as a template for my pages. I then used a quilting needle and did a hand straight stitch down the pages attaching the pages to the piece of fusible white sheets. I bought the thick Pellon stuff that said it was good for crafts. You just need a firm piece of the firm fusible interfacing.
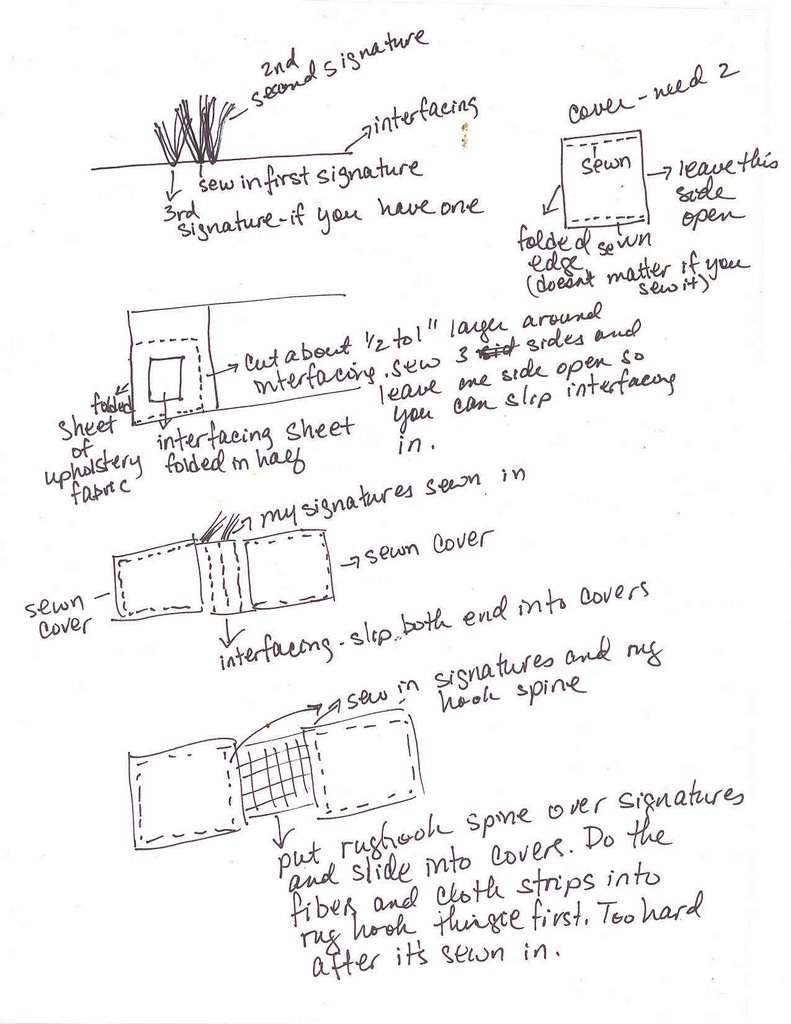
Basically, what you need to do for hte signatures is to take 5-7 sheets of your pages and put them inside one another like booklet style. You do not have to fold the pages exactly in half. I folded some of mine hot dog style before folding the page in half so I would have some instant pockets. I made one side really short and folded the other side to get a flap. I folded some others on an angle. Be creative in your folding. When you have all your pages, fold the interfacing in half. It should be approximately the size of your book. You will sew the pages in by groups. Your first group will be directly in the middle. The next one will be next to it and the next on the other side. . It does not matter if it is slightly off. What will happen is that both sides of the interfacing will go into the covers and you will sew the cover so the interfacing stays.
Traci used silence cloth for her covers. I did not find it. I used white upholstery fabric instead. It felt more like a plastic tablecloth. What I did was take the interfacing and folded the upholstery fabric in half. I cut two pieces of fabric that was about 1" larger all around than the interfacing. What you are going to do is sew 3 sides of the cover and leave one side open so you can slide the interfacing with signatures into the covers. You can cut four pieces of upholstery fabric but I found it easier to just fold over one side so that one side was folded - when you unfolded it the length would be double what you cut it.
Back to sewing the signatures. I found that after the first set that I did not have to do the hole punching thing. I would clamp down one side so the pages would not move when I was sewing. I just put the signatures to the interfacing and would start sewing. It did not matter to me if it was a little uneven. I had no problems getting thourh the layers. I would use a pair of pliers to pull it through if I had any problems. I have arthritis in my hands I often use pliers to help me pull the needle through.
I created pockets, flaps, hidden pictures, and all sorts of fun things with this journal. I sewed together pieces of paper towel and put that in.
The rug hook thing. I cut a piece large enough that could fit into the cover sleeves over the signatures so I could sew them in. I figured out about how many rows across I would have to do. I randomly hooked in fibers and pieces of cloth into every 2nd or 3rd hole. I did not do every hole. I did not cut until I was done with my covers. There is a reason for that. Once I attached the signatures and spine (rug hook) to my book, there were some expoxed areas. I cut the length of the fibers and cloth strips to the length I liked and used the scraps to fill in the bare areas. I just scrunched up some bald areas on the rug hook thingie showing and used a glue gun to attached the scrap pieces. That filled it in really nicely.
The covers. I put the pages into the covers and sewed them in by hand. Tried the sewing maching but it was rather thick with the rug hook thingie. Once that was done, I took some pieces of colored paper towel and scrunched them up. I then took some diamond glaze and put a layer of it on my cover. I then placed pieces of paper towel over it. I spread a layer of diamond glaze over that and placed some small objects like the flowers and circle in the paper towel. Let dry completely. Do both sides of both covers. I put a little flower and flowerpot that my son made for me a long time ago. I liked the brightness of the colors and liked how it looked on my back cover. Once dried, I swiped a gold brilliance pad over the raised areas for some highlighting. I swiped a blue dabber paint around the edges of the covers for contrast. I used a hot glue gun and used the spine scraps to cover up the exposed areas after I was done with the covers.
There is a diagram for visual learners like me. It is at the top of this message. Click on the diagram for a larger view. Email me if you have any questions or post a comment with your email in body of the message. It does not always tell me your email when you leave a message.


1 comment:
Thanx for sharing.................love the blog.......so colourful.
hugs
joan in italy
Post a Comment