By request, here are the instructions to my polymer clay charms that I created for swaps:
Polymer clay charms:
supply list:
soft polymer clay
pasta/clay machine
fondant cutters in different shapes
(I got mine at Joann Fabrics)
acrylic paints or fluid acrylics
small paintbrush
clay cutter
clay roller
clay oven
small, smooth glazed tile (glazed wall tile will do)
I use a small white bathroom tile, approx. 6x6”
large, smooth glazed tile
I use a bathroom floor tile, approx 11.5 x 11.5”
(I bought the tile samples at Menard’s)
UM texture stamps
large paperclip
Sculpey Glaze in Satin (found where the polymer clay supplies are)
(small glass bottle with white cap)
gold paint pen – optional
wax paper
Note: Different colors of polymer clay require different oven temperatures. Each package of polymer clay will tell you which temperature should be used. Please note that especially if you are using different colors.
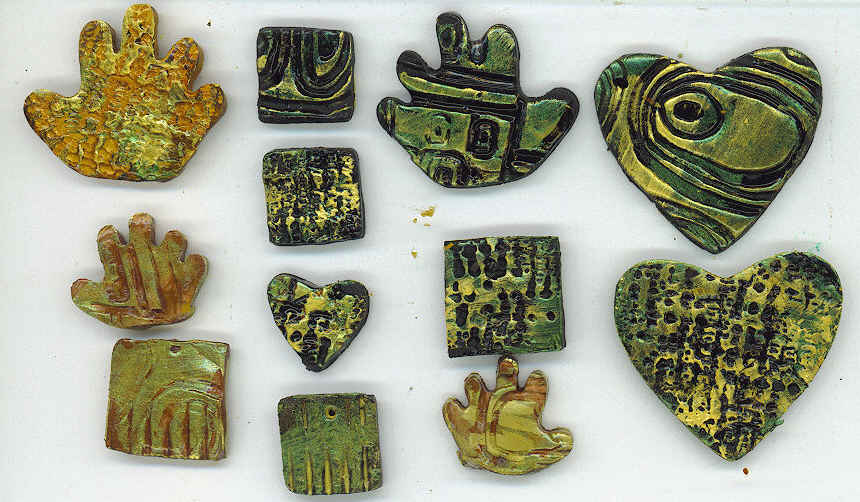
You might want to consider leaving some of the polymer clay color showing as part of the charm. That is especially true with black and metallic colors. You will see what I am talking about in my black polymer clay charms.
1. Take a piece of poly clay and condition it. You can either manipulate it with your hands or run it through a pasta machine until soft and workable. I run the clay through on the widest setting of the pasta machine.
2. Take the piece of clay and run it through the pasta machine at the widest setting a couple of times until you get the approximate size of your UM stamp.
3. Place the piece of clay on top of the UM stamp and place another UM stamp on top of the clay face down. Use a roller and roller over the UM stamps and clay evenly. Press down with steady pressure. It helps to do this step on a hard, even surface.
Lift off the top UM stamp and carefully peel off the clay from the bottom UM stamp. Width should be ¼ to ½ “– depending on how thick you want your charms to be. If your edges are too thin, then do not use that part. You can reuse that section later. Place the textured clay sheet on the large, smooth tile.
4. Take the fondant cutters and cut the shapes from the textured clay and lay them on the small, smooth tile (not touching). For the lines going halfway down the square shapes, I just bent the ridged cutter and pressed down on the clay shape. All the other textures came from textured stamps.
5. When done, take the end of the large paperclip and pierce the clay shape where you want your jump ring hole. Give it a little twirl in the hole to make it slightly larger than the diameter of the paperclip end. The hole will get a little smaller after it has been in the clay oven.
6. Put the small, smooth tile with clay pieces into the oven and set at recommended temperature. Turn it on for 30 minutes in a well ventilated area.
7. Repeat steps with additional clay. If you are done, then take the leftover clay and put some plastic wrap around it to save it for another day.
8. Once the clay has cooled, you can start painting. You might want to leave the depressed parts of your texture showing if you like the color. If you do, then use a flat brush and a light hand to apply the paint. I used bronze, interference green oxide, black, iridescent gold, and iridescent copper. On each batch of charms, I would use two or three different colors depending on the clay color. Let each color dry completely before applying a different color.
9. Optional: You can use a gold paint pen to edge the charms. I also randomly drew on the surface with the gold paint pen on some of the charms to get a little gold color on there.
10. When the charms are completely dry, put the charms on a piece of wax paper. Do this step in a well ventilated area. Use a small, clean paintbrush and dip the brush in the Sculpey glaze and apply on one side of the charms. You can also lightly do the sides at this time or when you turn them over later. You do not want to use a lot of glaze here because it can pool on the bottom of the wax paper and get stuck to your charm. That might ruin your charm. If you want, you can also put the paper clip through the jump ring hole again. Sometimes, the glaze will close the hole. I always poke the paper clip end through the jump ring hole after I am done glazing. You might want to wait to the end if you don’t want to disturb your charms while they dry. Let the one side dry completely.
12. Turn over and glaze the other side. Let dry completely.
13. Let the charms sit until completely dry and not tacky. Use your paperclip end and poke the end through to make sure the glaze did not close your jump ring hole.
14. Enjoy your charms.


No comments:
Post a Comment