Showing posts with label found object. Show all posts

Saturday, July 17, 2010

Newest bracelets and mini tutorial

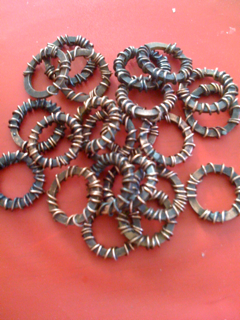
Copper washers are from eBay. I use 18 ga wire and wrap it around the entire washer. 20 ga wire is too thin and does not look as good to me. You can go directly to liver of sulfer or Jax but I like to heat mine with a torch and/or solder so the ends don't stick up (stay put, but not really necessary). I like to heat mine with a torch because I love the richness in color the torch gives the copper washer.
If you are going to solder, don't forget to flux! Here is pict of my washers after they have been heated with a torch but before polishing. They have been fluxed as well because some of them have solder on them. Just heat the washers on a solderite pad until they are a dark color. Here is where I got mine: http://www.riogrande.com/MemberArea/ProductPage.aspx?assetname=502063&page=GRID&free_text%7c1256438945578=soldering+pad
This is the tripod with screen that I use (in case you are interested): http://www.riogrande.com/MemberArea/ProductPage.aspx?assetname=502085&page=GRID&free_text%7c1279377490471=tripod

This is what they look like after they have been put in liver of sulfer, rinsed, polished with steel wool (type 00 found in paint dept of hardware store), and then sealed with Renaissance Wax.


Here is a pict of the washer being used in one of my new bracelets. I am also wearing the ball chain bracelets. I always have those on. I also use those for charm bracelets. You can get those at skybluepink.com.

Here is a pict of a strip of sheet metal that I rolled up diagonally, bent to fit the curve of wrist, cut the ends, and then wrapped wire around the entire thing. I also added wire eyes at both ends so I could attach elements for making a bracelet. I soldered the whole thing to keep it together and to make it stronger so the wire wouldn't bend.

Piece of copper sheet that has two pins soldered on there. I get my copper sheet from basiccopper.com. You can get it in small quantities in diferent gauges. They even have scrap packs so you can make jewelry.
How I make my lace button jump ring elements for my bracelets:
Cut a strip about 4-5" long. You will get a hang for how long you want it based upon how chunky and how long the piece will be. I use off-white lace. White is too glaring. The lace will be about 3/4-1" wide. Take 2 jump rings and thread from both sides and bring in to about where you want them to be. Bring one side in and fold in the middle once or two. It is okay to overlap. How messy is up to you and it adds to the look. Do the same thing with other side. Hand sew the middle from width to width. What I do is bring the edges towards the middle so it looks a little like a corset. Sew on a white/beige button. I have been using bone type buttons. Knot and done.


I got the idea for the lace button elements from Ruth Rae and Stephanie Lee. I have seen it on some of the things that they have done. Need to give credit where credit is due.
If you are interested in learning more about soldering, here are some resources. Stepanie Lee just closed this online course, but it looks very interesting. She has a newsletter so you can be updated on the next class:
I really like the stuff from Simply Swank for soldering with a gun. They also have vids that you can watch. I use their non-toxic flux. http://simplyswank.net/
Enjoy the summer and have fun playing.

Monday, July 28, 2008

Weekend Assemblages


I took the weekend off from any heavy artwork. I cleaned, hung out, and basically tried to recharged my internal batteries. I was exhausted from going 3-4 weeks non-stop. I watched TV with the kids. We went out and did things. They got to play in the pool. We spent some quality time together. While we were watching TV, I set up some stuff so I could assemble some jewelry. I had gotten some really fun pieces and wanted to put them together.


The third pict is from mostly Tim Holtz stuff that I bought from skybluepink.com. If you click on any of the picts, you will get a larger view. The Tim bracelet looks great on my wrist. I got the idea from his idea-ology make 'n take necklaces from CHA. I am so groovin' on the piece of leather strap made into loops with some wire wound around it. The little jump rings that I added really makes the look.
Just thought I would share. I still have some of the copper book necklaces for sale on my etsy.

Thursday, July 17, 2008

Dremel Sample - Sewing Box


I have to admit that this was an afterthought. I was dabbing on alcohol inks with the blending foam when I had extra alcohol inks on the foam. I was looking for things to dab so I wouldn't waste it. I have some claybord boxes that were just sitting there doing nothing. I did this right after I did the bangles (more to come about that later). I found out that the alcohol inks work well on wood as well. Not necessarily the unfinished wood with splinters in it but the DIY wood or wood-like finishes. Anyway, it worked great on the sides of the claybord.


After I dabbed the whole thing with alcohol inks, I put on some crackle paint in random areas. I let that dry and then used different distress ink colors on top of the crackle paint and on the alcohol inks to age it up a bit. The back of the claybord had writing on it, so I glued on some scrim that I got from the Quilting Arts website to the back of the box. I used my finger and dabbed on some gold paint in random areas to contrast against the dark sides.
I added the sewing elements to the box. I used the distress inks to make them look old and used. I used my Dremel and drilled holes in the top so I could attach the bobbins. The bobbins were also alcohol ink'd.
Yeah, I know that the scan is not so good. I could take a pict of it, but I am not feeling it right now. Maybe, I will do that later. I am groovin' on the final product though.

Dremel Sample - Spoons wall hanging


It is still a WIP but it is nearly done. I just added a bit of paint for contrast. It is sitting here with paint drying on it. I dripped some glue on it for texture and for a more aged, sitting-there-for-a-long-time look.


The spoons were alcohol ink'd. I did some basic wire wrapping on it. The scan looks a little dark. They look better in real life. Click on the link for a larger view. The backing is a piece of wood that has some latex paint and then some crackle paint on top of that. I cut some yardstick pieces and glued that on. I used the Dremel to drill holes through the spoons and into the wood. Used some wood screws to secure the spoons on. They were a tad loose, so I put some glue on there. I did it rather sloppily to add to the look. The hanging thing is just some copper wire that was oxidized.

e

Thursday, July 10, 2008

More earrings for Dremel


My focus from A to B has changed. I was going to do some WIP charm bracelets for the infomercial, then I found out that there would be another jewelry/scrapbook person there. I decided more projects and less jewelry. I still might do one bracelet, if I have time today.

The ones on the right are for Dawn from Dremel. She is very nice and likes silver jewelry. Don't you love the hands? These hand charms are very nice. Well done. They are finished on both sides. Not cheap looking at all. Oh yeah, I got them from skybluepink.com. The hand charms are from my private stash. Can't believe I am using them now.

If you don't know, I have pierced ears but rarely wear earrings. I am not big on jewelry and have a tendency to keep something on for days or weeks without changing them. That is why I love it when my family buys real gold or sterling silver. I don't have to continually take it off. I don't change jewelry when I change my clothes. Sorry, TMI. Anyway, my ears don't do well with earrings on for a long time, so I don't wear them very often. Don't understand why I like to make art jewelry when I don't wear it most of the time. I try it on to see how it looks and it's over.

Wednesday, July 09, 2008

Altered Spoons


In a very recent issue of CPS, Kelli did some really fun things with spoons. Here is my version. It is not done yet. I still need to change the color on the really bright wire. I have to attach the spoons to a backing. I have chosen to not put words on there. That might change though.
I got these spoons at a huge garage sale at my daughter's preschool. I rummaged through all the silverware until I picked out all the cool spoons. I put them aside for another day and the perfect project. Well, that day has come. Yes, Sandy, you are right in this case. Sometimes, it is best to save something and not sell it/give it away/throw it out.
Use wax paper so you don't muck up your table. Alcohol inks can be sticky and gooey. You can do both sides if you want. I only did one. I was actually doing something else with alcohol inks and the blender tool. I had some excess ink on the blending foamy thing, so I started dabbing it on whatever metal was available. I grabbed the spoons. I dabbed until there was no more to dab. I let it dry a bit and then dribbled on different colors on different spoons. I let dry while I was doing something else. I am mounting the spoons to a surface, so I had to measure out how I was going to do that. If you are going to screw the spoons to something, make sure your hole is big enough so the screw will thread through to the head.
When you are drilling the hole through the spoon, it might take a couple of passes to drill through. I would drill, get the hole started, let up, and then would try again. I put a bit more pressure into the drill the second time around. I also did it again to ream out the hole a little.
I sat and did the wire wrapping while watching a CSI New York rerun. I have to mount the spoons to the surface. I have to remember to leave off one spoon so I can finish it during the infomercial. It is an unnatural thing for me to just leave off a step or a part of the technique/pieces so I can do it later on in LA (maybe do it). I don't like to leave my stuff unfinished when I can see the end is near.

Wednesday, July 02, 2008

Frames for Dremel


Here are my samples that I made up for Dremel on Monday. I brought them up with me when I went to see them in Racine, WI. I went up there to show the Dremel ladies how I did my frame so they would know what we needed to do while at CHA. I like these frames a lot more than my original samples. We did a mini workshop while I was there.
They are a lot more scrapbook-y than my usual stuff. I had to think of something that would make a good make 'n take. I wanted to use stuff that people might carry in their store. I also had to consider my audience. There are a lot of scrapbook type retailers at CHA. Of course, any mixed media artists that did the make 'n take could change it to what they wanted. That is the beauty of having a lot of embellishments.
The top frame is meant to be more male - no flowers. There are a lot of men who go to CHA and do the make 'n takes. I had quite a few men do the mah jong pendants at the last two CHA shows.
Basically, this make 'n take is Lumiere paint, drilling, using the new Dremel Driver (screws nails and screws into things), and embellishing with the Dremel glue gun. I have to tell you that the Dremel Driver is a lot of fun and very easy to use. You might have seen the battery powered screwdrivers. This is the same idea but I think easier to use. We had a Black and Decker one for a long time. It worked okay but it did not keep a charge very long. This Driver had a good charger. It's design makes it easy for me to hold in my hand. It is more like holding a gun rather than a long tube. It has a convenient button so you can go into reverse - which I do a lot. DH loves this one as well. Hey, Phil, mine!
Can you tell that I am so loving the Prima flowers? I usually don't like the paper flowers but I love these. They have the text, different pictures, and little collages on them. I don't use the pink ones that much. Beth, you can have all of those. They are amazingly durable. The words were made with the mixed mini grungeboard letters. You can buy that at skybluepink.com. I have a link in the right column.
BTW, the Dremel hot glue gun has a fine point tip for detailing and for smaller items. I used mostly found objects on these sample frames but there will be a lot of fun smaller things like Scrabble tiles, bingo tiles, little metal objects, etc...at CHA. I don't know what booth we will be at. Look for me. Come and say hi to me. You can even do the make 'n take. Hope to see you there!

Thursday, June 26, 2008

playing with resin from Little Windows


Click on the picts for a larger view.

There was this woman at a booth right across from where I was doing demos at the Quilt Festival. It was not until the last day that I made it over there. She had this great way of making resin charms/pendants without the bezels. Now, I have seen some other products elsewhere but I did not really like them because the resin did not come out easily.


http://www.little-windows.com/

http://little-windows.com/store.htm?cid=6 resin

http://little-windows.com/store_item.htm?itemid=58&cid=13 mini drill only $6!

I finally got around to trying it. I used found objects and made bracelets out of them. I just wanted to play. The molds were easy to use. They did come a little bit warped but they bent back straight without a problem. There is a leaflet included with the resin kit that tells you everything you need to do. Instructions were easy to follow.
Some of my found objects were thicker than others. They needed more resin. I guess you would need to watch that. Probably more shallow items would work better. I really liked how the buton and and the flatter charms turned out.
The resin itself was easy to mix and it did not smell. The trick is to stir slowly so you don't get bubbles. I did not get that many bubbles when pouring or afterwards. I did get a few but they easily popped. I found one trapped underneath a charm but I never would have found that anyway.
I waited overnight before popping the resin charms out of the mold. I put it in the freezer for about 30 seconds before doing so. If you lay it on a hard surface, resin side down and press with thumb right in the middle, they come out easier than twisting the mold (for me, at least). I started drilling the holes right away. I got the mini drill that was on their site. It is a handy little tool. I think it is adorable. There is one thing though. The length of the drill bit is fixed. If you do deeper pieces, then you will need something like a Dremel tool or something with a thinner diameter drill bit to go through the resin. The mini drill will only go so far since you cannot adjust the drill bit.
I had no problems putting holes in a couple of the charms. The problem was with the wire. I started putting the bracelet together about 15 hours after the resin was poured. It was still too soft. The wire was ripping into the edges. I stopped and waited an extra day before doing the wire stuff. It was still easy to ream out the holes in the resin with the little drill two days after pouring.
I usually use resin from Rio Grande. This resin is just as good and the pricing is comparable, if not better. What I liked about the kit was that there was a clear plastic lid to the kit that served as a clear cover for my mold while the resin was hardening. That kept the dust off. For those of you who have done resin before, dust can be a pain because it can show up on your resin like little dimples.
Of course, you can use this resin with the metal bezels. Suze Weinberg and Susan Lenart Kazmer carry bezels. I like the no bezels thing, too. This way is so much easier than using tape and borders and yada yada yada.
There is one other cool thing that I have not tried yet, they sell this doming tray that you can use to put a dome on your resin piece. That would be great for buttons, pendants, etc...I just think that would be fun to do.
If you try it, let me know how it turns out.

Tuesday, June 10, 2008

The other three 6" panels


Info in the following post. Elizabeth and friend, hope you like them!

Tuesday, May 27, 2008

Peek at my squares


I am in a private swap. Here are two of my six squares. Just wanted to share before I delete the scans off my hard drive. What I love about private swaps is that I know that the quality of what I get back will be as good (or even better!) than what I have sent out. I know that most people put a lot of work into their swaps. You have to admit though that you will sometimes get those one or two pieces that look slapped together - glue is all over it, not dried yet, stinky, or one sticker is stuck on as the focal point. I also like the smaller quantity. I get to do more with it. Even though sometimes less is more. Yes, rambling now. Need tea and snackie before beddy-bye. BTW, even though my current love affair is with fabric, I can't get away from metal. Metal will always be my best friend.

Sunday, April 06, 2008

Make your own pencil charms


These are for charm bracelets or charm necklaces. They wear well either way. I had a pencil necklace but traded that with someone. They are not hard to make. Did you know that the metal band that holds the eraser in place on a pencil is called a ferrule? In case you are interested, here is how pencils are made:

http://www.generalpencil.com/how-print.htm


1. Take a pencil and use a pair of flush cutters to cut into it in a circle. You want to do it about 1.5'-2" from the metal end of the pencil. Basically, you want to cut off the rest of the pencil. Take the flush cutters or the cutting part of a pair of pliers and cut into the pencil where you want to break. Just go around the pencil in a circle using the pliers. You don't have to go all the way through. The pencil is soft enough that it will break in two, if you give it a start. If it is too long then, you might want to break off more or you can always just sharpen it more later. I just eyeball how long it should be. Measure-schmeasure. Don't let my 6th graders know I said that though!


2. Once the pencil is broken off where you want it to, you will need to sharpen it a bit. You don't want it too sharp or you will stab yourself. I sharpen it just a bit until a see a little bit of graphite poke through. If you get it too sharp, you can break off the tip with the flush cutters or scribble a bit on a piece of scrap paper. I have found that electric sharpeners don't usually work here. The sharpener is too far away from the opening and I can't get it to sharpen. The ferrule gets in the way or the pencil goes in too far. The manual sharpeners work much better. I use the kiddie sharpeners that they sell in my school store and they work great. Makes my thumb kinda sore after awhile though.


3. Once you get the pencil sharpened and short, you can do the following two steps in any order you want. It does not matter if you drill the hole first or coat the graphite. How I do it depends on my mood and which one is easier for me at the time. I coated today first. You can use any liquid glue. I use Diamond Glaze. I just dip the graphite end into the glaze, tap off the excess, and let it dry on some wax paper. This is so you don't write on your clothes when wearing it. I have used both Sobo and Diamond Glaze.


4. Take your Dremel or similar drill. I use a 1/16th drill bit. Hold the pencil steady. Have you ever noticed the little indentations in the ferrule where it is pressed in to keep the eraser where it is? That is where you drill through. The Dremel work station is great for this. Just put a piece of cardboard or matboard over the opening so the pencil does not fall through. Put a hardcover book or piece of wood underneath the pencil so you don't drill into your table, if you don't have a drill press.


5. I use 20 gauge wire. I do some wire wrapping on both ends. You will have to Google how to do that or a lot of the jewelry books tell you how to do that now. This page might help:


http://www.wittyliving.com/crafts/jewelry/wirewrap_index.html


Then you are done. Add a jump ring and you have a charm.


Comments welcome